


Bubblegum Garden Rug Guide
Welcome to the guide for your Bubblegum Garden Rug Kit!
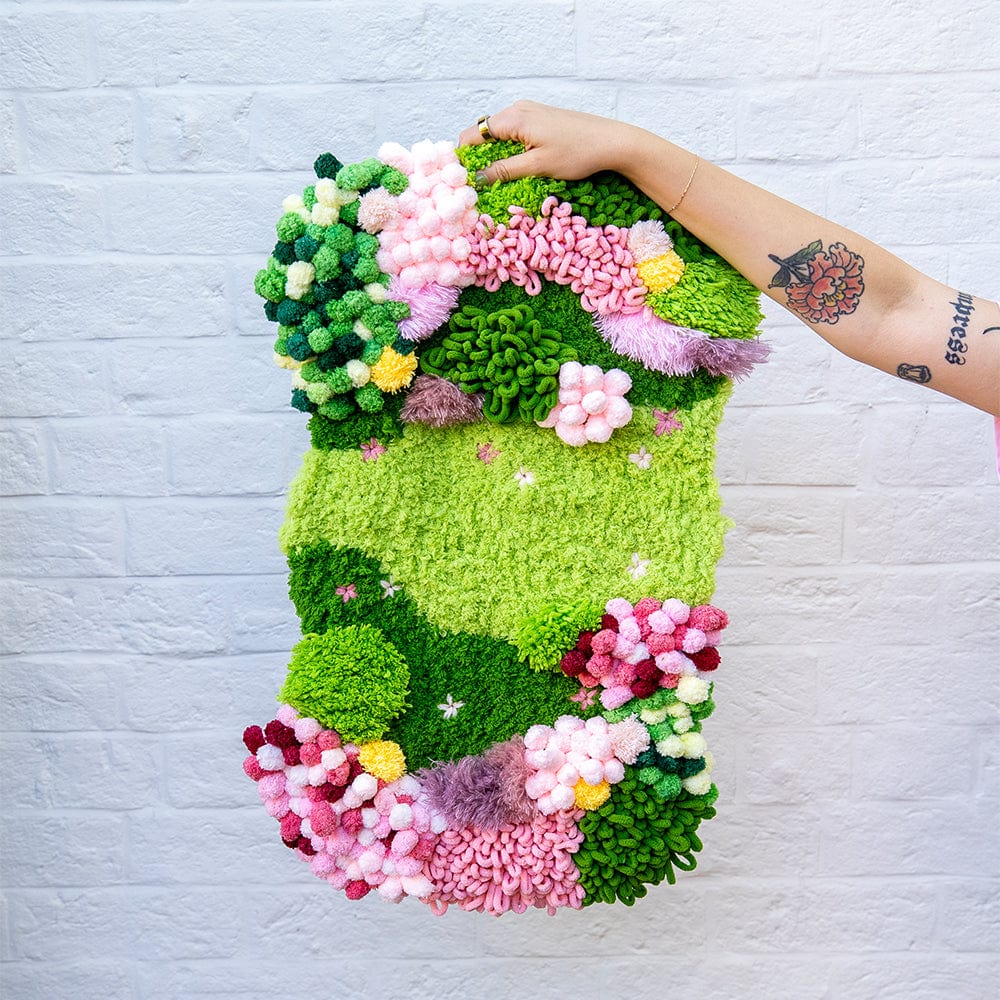
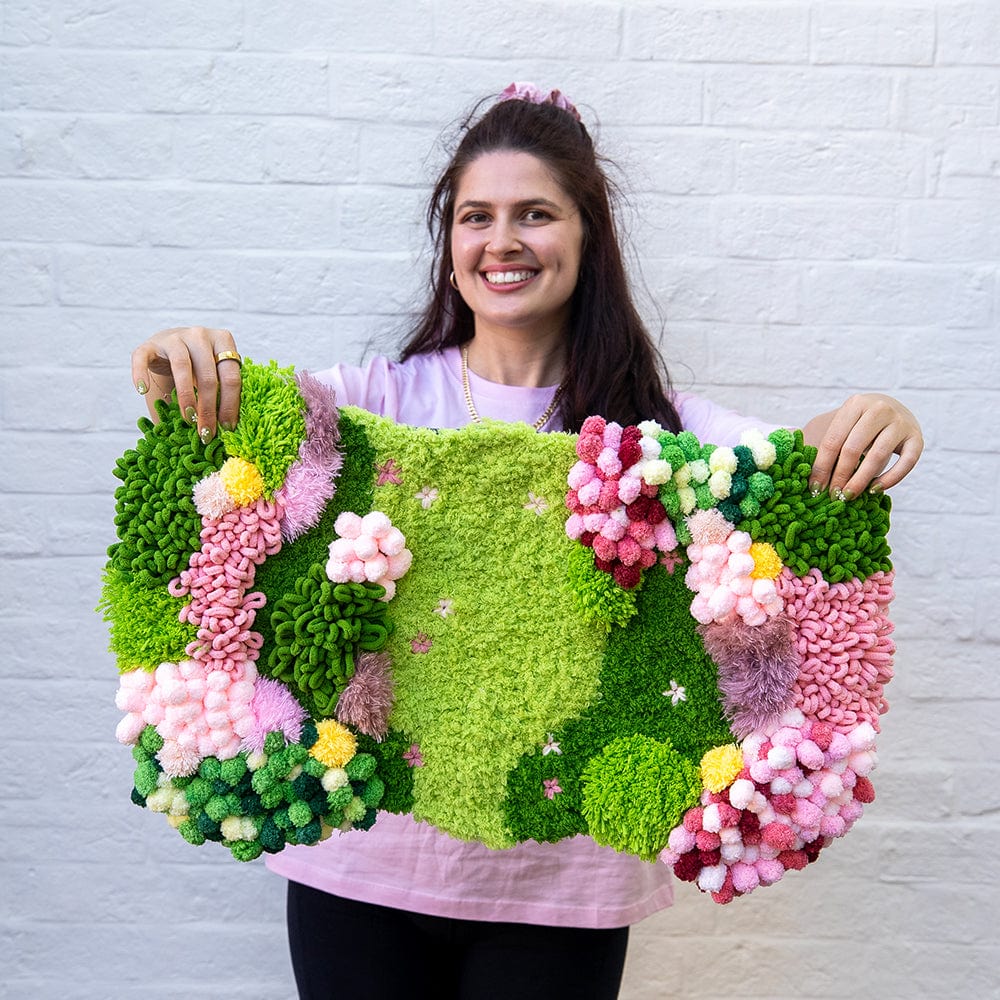
Below you will find all the information you need to create your own lush, mossy oasis to display in your home. This supersized design is sure to be the focal point of your space!
🌼 🌼 🌼
Inside Your Kit
Your moss kit includes bucketloads of materials!
Materials:
- Feather Yarn in Light Green (2x balls) and Grass Green (1.5x balls)
- Chenille Yarn in Soft Pink (1x ball) and Grass Green (1x ball)
- Bobble Yarn in Variegated Green (1x large ball), Variegated Pink (1x small ball) and Light Pink (1x small ball)
- Milk Yarn in Light Green (3x balls), Soft Yellow (1x ball), Pale Pink (1x Ball) and Bubblegum Pink (1x ball)
- Mohair Yarn in Light Pink (1x ball), Soft Mauve (1x ball) and Deep Mauve (1x ball)
Tools:
- Printed Rug Canvas
- Non-slip Felt Backing
- Plastic Latch-Hook
- Wooden Latch-Hook
- Pom Pom Scissors
- Weaving Needle
- Steel Sewing Needle
- Cotton Thread in White
- Hot Glue Sticks
Learning:
⭐ Online instructions and video tutorials
⭐ Pattern template
Additional materials:
Our kits come with everything needed to sew the coaster backing on, but you may want to use fabric glue or hot glue if you have it handy.
You may also want to use sharp craft scissors for cutting your base. Our XL Gold Rug Trimming Scissors are perfect for this kind of project. You can find them here.
Download Your Template
If you would like to get creative and design your rug differently, download our template here!
You can use this to draw or take notes on how you want to make your rug your own.
Bubblegum Garden Moss Rug Guide
Our mission with our Moss Rug collection is not only to help you make a lush oasis for your home - but also to empower your creativity! We want to give you the skills and creative liberty to make this rug your own and not necessarily exactly like our example.
Your Bubblegum Garden kit comes with enough supplies to recreate our rug if you so choose. But we've also included extra yarn in most colours so that you can choose your own elements across the canvas and really make it yours.

1. Understanding how to put your rug together
If you've already made one of our moss coasters before, you'll probably find it quite easy to understand the different techniques used in this rug. But if you're new it might seem like a lot of information - but don't fret!
Each technique used on this rug is quite simple. We're just repeating the same easy techniques again and again to cover a larger space than a coaster. So don't feel nervous about the large surface area, we promise that once you get into the swing of the project, you'll find it easy.
Sections of your rug:
When working on this project, it's best to think of your rug in 3x different sections.
a) Foundational section
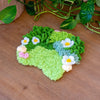
This will form the base of your rug and includes the different colours of woven feather yarn that you can see in the image above. Most of the space on your rug will be covered with this feather stitching, because its quick to create and it makes for a nice flat surface. It's also great 'filler' for in between your textural sections.
b) Textural sections
The textural sections of your rug include a range of techniques that will create interesting features that draw the eye! This includes our bobbles, fuzzy loops and long latch hooked 'hair'. Because these areas will be the focal point to your rug, you want to consider the different ways that you can arrange them on your rug.
c) Decorative sections
Finally we have our decorative details! These sections include anything that can be 'added on' at the end to create extra visual interest and texture. Because they can be added on top of your foundational and textural sections, you don't need to think about these until you're close to finishing your rug.
2. The techniques used for your rug
Below you'll find two images showing the techniques you'll find in your Bubblegum Garden rug; an image version and a diagram version. Both label the different techniques you'll need to fill up your rug, but I find that different visuals work for different people - so refer to whichever you find most useful!
Take a look at the different sections using these images, and think about which you like the most. You can also take a look at the product page here to see extra photos of this design.
Techniques Used:


Techniques Used
- Woven Grass - Feather Yarn
- Bobbles - Bobble Yarn
- Fuzzy Loops - Chenille Yarn
- 'Hair' Moss - Milk Yarn
- Embroidered Flowers - Milk Yarn
- Pom Poms - Milk Yarn
Each technique is colour-coded to match the sections mentioned in step 1.
3. Choosing your yarn for each section
Now that you're familiar with how each technique looks on your rug, its time to lay out all your materials and choose which yarn and colours you would like to use on your rug!
See which textures you're most drawn to and play around with the placement on your own rug. Use your intuition and creativity to place your favourite textures and techniques wherever you think looks best!
If you'd like to make notes on your design, we've made a PDF template for you to use. You can download it here! Alternatively, you can place the balls of yarn onto your rug canvas to compare where you'd like them to go.
Don't put too much pressure on yourself at this stage. Go with textures and colours that feel right, but remember you can always change them later as you progress in your rug.
If you're ever unsure, just follow our guide above to recreate our rug design. We promise it will look great!
If you would like to recreate our Bubblegum Garden Rug exactly, we've included diagrams under each step below.
4. Stitching Foundational Sections
Now it's time to get stitching! We recommend starting with some of your woven 'grass' sections first. Choose between your light green and grass green feather yarn, using your plastic weaving needle to stitch them onto the canvas. If you're not sure where to start, work your woven grass into a corner or edge section. This will help you get comfortable with stitching onto a large canvas.
TIP: You can stitch this project in any order you like! Feel free to start with any of the textural sections that we have mentioned below and add the foundational sections later. The only reason we recommend starting with the woven grass is because its easier to stitch first and fill in the gaps with textures. But follow your heart if you'd rather start somewhere else!
Woven Grass Video Tutorial
Woven Grass Colours & Sections:

5. Stitching Textural Sections
Now it's time to move on to the fun parts! Adding all those scrumptious textures to your rug.
Bobble Moss Video Tutorial
For your Bobbles you'll be using three different colours of bobble yarn: variegated green yarn, variegated pink yarn and a light pink yarn. Follow the video below to see how you'll cut your yarn into smaller pieces and attach them onto the canvas.
Bobble Colours & Sections:

Fuzzy Loops Video Tutorial
For these loops you'll be using two colours of chunky chenille yarn, your grass green and soft pink. You'll be using a latch-hook tool to add these to your canvas.
Watch the video below to learn how to stitch your fuzzy loops.
Fuzzy Loop Sections:

'Hair' Moss Video Tutorials
Finally its time to add your 'hair' moss using a range of milk and mohair yarn types.
For this technique you'll be cutting your yarn into shorter pieces. The length will depend on the look you would like to achieve. You can cut them from as short as 5cm (2 inches), to as long as 15cm (6 inches). The longer the yarn, the more shaggy and textural it will look.
Cutting Your Yarn: For our rug we've used lengths that are around 10cm long (4 inches). To cut these lengths in bulk, you'll want to cut out a piece of cardboard that is half the length you would like your pieces to be. To recreate our length of 'hair' moss, cut out a piece of cardboard that is 5cm across (2 inches) and wrap your yarn around the width again and again. When you've built up a big wrapped bundle, take your scissors and cut down one side of the cardboard - this will cut all of your yarn into pieces that are approximately 10cms each!
Half-Half Yarn Colours: If you would like to blend your 'hair' moss, you can create pre-cut lengths using multiple colours. Simply use the same process as above, but instead wrap two or more colours of yarn around your cardboard rectangle.
Yarn Strands: You can use multiple strands of thread when creating your latch-hooked knots. I recommend using between 1-2x strands for milk yarn and 4-5x strands for mohair yarn. The more strands of yarn you use, the denser your 'hair' moss will be.
Technique 1:
When using 2x pieces of yarn, sometimes the below technique can be easier as it stops the second piece of yarn from escaping. Use your wooden latch-hook if you're working with longer strands of yarn.
Technique 2:
You may find it easier to use our traditional technique to latch-hook these sections. Depending on your style, you may find this easier even with 2x strands of yarn. Everyone is different, so just give both a go and find what you prefer!
'Hair' Moss Colours & Sections:
For our rug we've used the light green milk yarn and shades of mohair yarn in pale pink, soft mauve and deep mauve. We've used 2x strands for our milk yarn sections and 4x strands for our mohair sections. We've trimmed the mohair after it is stitched to create a smoother finish.

6. Stitching Decorative Sections
Once the surface area of your rug is covered, its time to add the finishing details! You have a few options to choose from here, including a range of pom pom variations and embroidered flowers.
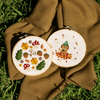
Embroidered Flowers Video Tutorial
If you're recreating our design, the first decorative technique you'll want to use is embroidered flowers, using your pale pink and bubblegum pink milk yarn.
Use the video tutorial below to create small flowers dotted across the feather yarn sections of your rug. For our design, we've kept it simple with only a few flowers, but you can add as many as you would like!
BONUS Feather Yarn Embroidery Tutorial:
An alternative embroidered technique is to use feather yarn instead of milk yarn to create subtle contrasting details on your grassy sections. You can watch the video below to learn this technique.
Pom Pom Video Tutorial
You can use any colours of your milk yarn to create your pom poms, use contrasting colours to make them stand out, or pinks to blend them into your other textures! In our design we've kept the use of our pom poms quite subtle, so that they blend into the textured woven sections and highlight them, rather than overpower them. Here is how we've made the pom poms on our rug design, if you'd like to recreate it:
Yellow Cut Pom Poms (Small) - Place a 20cm length of yarn in between your first and second finger. Wrap your yellow yarn around two fingers approximately 25x, then use the length of yarn to tie your pom pom. Cut the loops to create an open fluffy pom pom, and either use your weaving needle or a small comb to brush out the strands.
Pale Pink Looped Pom Poms (Small) - Place a 20cm length of contrasting yellow yarn in between your first and second finger. Wrap your pink yarn around two fingers approximately 25x, then use the length of yarn to tie your pom pom. Leave it looped with your contrasting yarn appearing like the middle of a flower.
You can use the video below to create variations such as looped pom poms or multi-coloured versions.
Decorative Sections:

7. Backing Your Rug
Congratulations on finishing your giant mossy rug! This project is no walk in the park (or roll in the grass) so its a huge achievement to have reached this stage.
There are two options for backing your rug: gluing or sewing.
Gluing your backing is much quicker but it requires a hot glue gun, or tacky fabric glue of some kind. Sewing takes more time, but it can create a more aesthetic look for the backing.
Our video tutorial below will show you how to do both alternatives. You can also find the written instructions below as well.
Trimming and sewing down your canvas
Start by trimming your canvas, leaving between 2-4 inches of space around your rug edging. Then thread your sewing needle with the cotton thread included in your kit - you'll have 5x skeins of white thread, this should be enough to do this step as well as sew the edges of your backing if you choose to. Fold the edges of your canvas over and stitch them down with the thread, this doesn't have to be neat or perfect as it's just to 'pin down' the backing so it doesn't move around.
Backing Your Rug: Sewing
If you don't have access to a hot glue gun, you can only use your needle and thread to make the backing to your rug. Follow the instructions in this video below where we have used a 'no-glue' method.
If you have glue handy but you'd still prefer to make your rug more secure with thread, start your backing process by placing your rug onto the felt canvas, ensuring the non-slip side is facing down. Then use your hot glue in the middle areas of your rug to stick it in place. The purpose of this is to keep your rug from moving around the canvas, rather than to make it secure. Once its stuck down, you can follow the steps in this video to cut out your felt and sew the edges
Backing Your Rug: Gluing
If you have access to a hot glue gun, then using this method will be much quicker! You'll be able to complete the backing process in under 30 mins.
Start by placing your rug on top of your grey felt, ensuring the non-slip side is facing down. Use your hot glue first in the middle areas of your rug to stick it in place. These first blobs of glue are to keep your rug from slipping around, and not necessarily to make it secure.
Once your rug is in place, you'll take a sharp pair of scissors (we recommend our rug trimming scissors! But anything sharp will do) and roughly cut out the shape of your rug. It's better to make it too big at this stage, as you can cut your felt down. But if you cut it too small, you can't add more felt!
Once you've cut the grey felt to shape, use your hot glue to secure all around the edge of your rug. Really make sure your edges are stuck down to the felt. Then go in with your scissors again and do any trimming that is necessary!
You might need to repeat this process a couple of times, until you're sure that your edge it secure and your felt is cut to shape.
TIP: If you'd like to add extra security, you can sew the edges as a final step as well. Use the video tutorial above to do this. It can be hard to sew through hot glue, so if you've used a really large amount of hot glue on any edges, this is something to consider.
And you're done! Congratulations on finishing your mossy creation. We hope you've enjoyed the journey!
Thank you!
All of these tutorials are personally written and filmed by me - Nakisah - the founder of Craft Club. I always love hearing from customers (whether you loved your experience, or there was something you'd like to give feedback on) so please come say hi at hello@craftclubco.com or send us a DM over on Instagram @craft.club.co.
I'm always working on ways to improve our kits so that they are as easy as possible for our incredible customers! So all feedback is welcome (but please be nice haha).
Nakisah x
Join The Club!
Be the first to know about new products, special releases, and much more!
