


Garden Friends Guide & Tutorials
Welcome to the guide for your GARDEN FRIENDS Moss Coaster Kit!
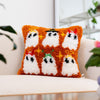
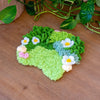
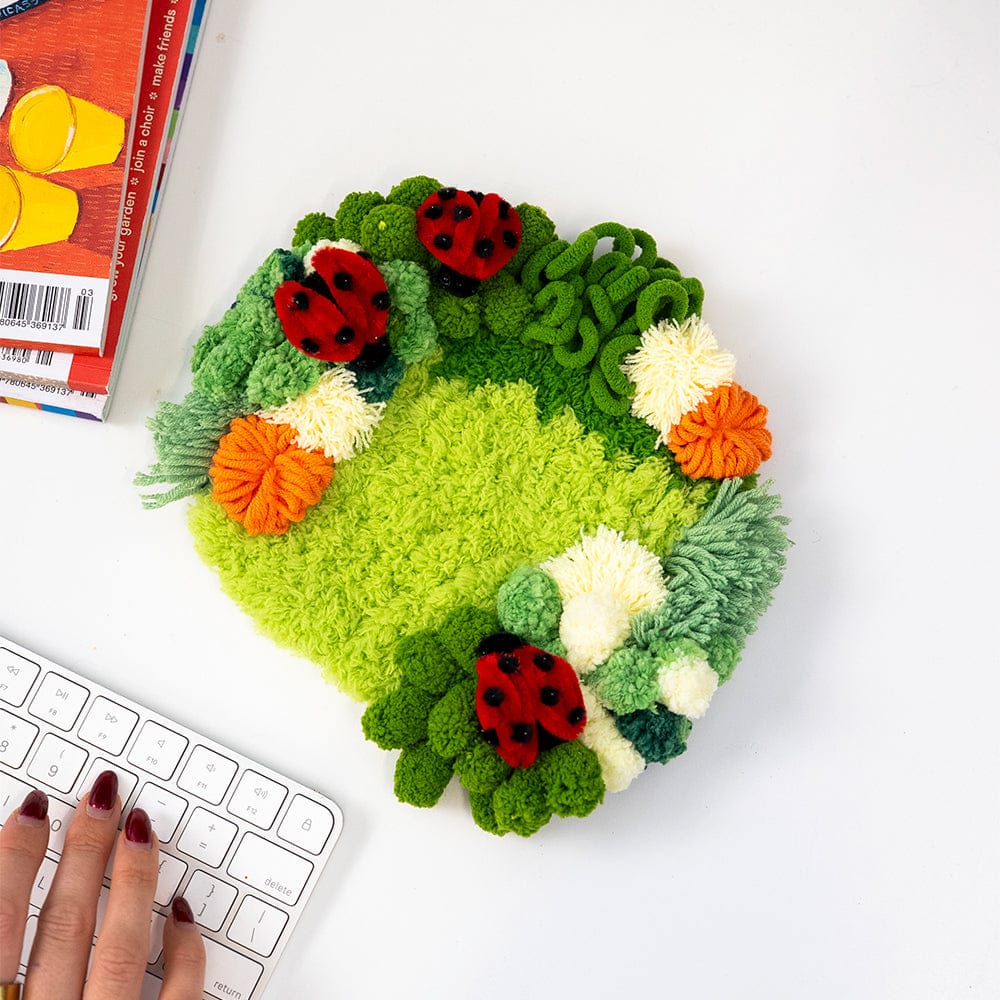
Inside, you’ll find everything you need to craft a cheerful little garden bursting with texture, colour, and adorable critters. This design features lush mossy greens, bright blooms, and your sweet handmade ladybugs — coming together to create a playful landscape that brings a smile to any space. 🐞🌿✨
Inside Your Kit
Your moss kit includes ...
Materials & Fibre:
- Bobble yarn in solid green and variegated green
- Feather yarn in grass green and light green
- Milk yarn in mint green, light yellow and soft orange
- Pipe cleaners in red and black
- Black decorative eyes
- Pressed felt in white
- Latch-hooking canvas base
- Pattern template
Optional additions:
Our kits come with everything needed to sew the coaster backing on, but you may want to use fabric glue or hot glue if you have it handy.
You may also want to use sharp craft scissors for cutting your base. Our embroidery scissors are perfect for this project because they're small but have a sharp blade.
Garden Friends Guide
Below you'll find each of the steps to making your Garden Friends coaster, with recommendations on the order to stitch each element. If you're a newbie to crafting it will be worth following this step-by-step, so that you can get comfortable with the techniques and tools used in this kit.
But if you want to create your own variations, you're more than welcome to stitch each section in whichever order you want! Don't feel constrained by our guidelines.

Step 1: Fuzzy Loops (using green chenille yarn)
Step 2: Bobbles (using variegated green and solid green bobble yarn)
Step 3: Latch-Hooking (using mint green milk yarn)
Step 4: More Bobbles (using variegated green and solid green bobble yarn)
Step 5: Feather Yarn Grass (using light green and medium green feather yarn)
Moving onto your decorative elements ...
Step 6: Pom Poms (using mint green, light yellow and soft orange milk yarn)
Step 7: Pipe Cleaner Ladybugs (using red and black pipe cleaners)
You can also use the image below to see the details of each element on your coaster.


Garden Friends Walkthrough
Below is a video that will walkthrough the creation of your moss coaster. This video will show you the process, but it won't include detailed tutorials. So if you're new to making moss coasters - keep scrolling to see the full video tutorials for each technique below.
This video is intended to be a relaxing walk you through of each step in your moss coaster, so that once you know the techniques you can craft along with us.
Step-By-Step Tutorials
This guide will walk you through each step of your moss coaster, and include video tutorials for each technique you will need to learn. If you're already familiar with the techniques used for moss kits, you may just want to watch our walkthrough video (shown above) without needing to dive deeply into each step.
First Things First - Transferring your Stencil
Your first step in creating your moss coaster is to transfer your coaster design from the stencil onto your latch-hooking canvas. To do this you'll need your canvas and a marker of some kind. We recommend using a sharpie or similar permanent marker, but a regular pen or drawing marker will work just fine.
Simply lay the canvas on top of your stencil and use the marker to trace the design behind it. The stencil matches our design with the smaller shapes roughly indicating where we will stitch each type of 'moss' in the following steps.
Feel free to get creative with the shape of your design, as your coaster doesn't have to be exactly like the stencil. You could make it a little larger or smaller depending on how you'd like to use it. Just remember to leave a 1/2 inch space between your coaster shape and the edge of the canvas.
TIP: Why not move the smaller shapes around within your coaster? You can get creative with the layout.
1. Fuzzy Loops
The first step to creating your moss coaster is going to be adding Fuzzy Loops to your design. You'll be using your green chenille yarn to create these soft and textured loops in the upper middle space on your design.
Watch the video below to learn the technique.
2. Bobbles
Next its time to create some lovely bobbled textures! You'll be adding bobbles using your variegated green and solid green bobble yarn, these will fill the two elongated shapes on the left side of the design.
Begin by stitching the top space with the variegated green colour of yarn - don't worry if the highly textured bobbles spill out over the space you've drawn. Next fill in the space below with the solid green colour of yarn.
Check out the video below to learn the technique.
3. Latch-Hooking 'Hair' Moss
This next textured section will be familiar to you if you've done one of our latch-hooking kits before. This time we use a slightly different technique to latch hook our yarn to look soft and 'hairy'. Use your latch-hooking 'hair' moss technique to fill in the space to the left side of your template.
Preparing your cut yarn:
To begin, you'll be cutting your mint green milk yarn into 6cm lengths. To do this, you'll create a cardboard template that is 3cm in width, and wrap the strand of milk yarn around the length of the template. Use sharp scissors to cut down the side of your wrapped yarn, creating many small pieces of 6cm yarn.
NOTE! Don't cut all of your mint green yarn. You'll want to leave around half (1/2) of your mint green yarn for a single pom pom at a later step.
Our video below will show you the technique for creating a simple cardboard template!
Latch-hooking colours:
Now that your yarn is prepared, its time to stitch! Each latch-hook knot will be made using 2x pieces of mint green milk yarn, to give it a nice density. You'll be filling in the section on the upper right side of your moss coaster design.
TIP: You can add some of your other milk yarn colours to this latch-hooked section if you would like, this can be done easily by trimming some other colours and creating your knots using 1x strand of green and 1x strand of another milk yarn colour.
Trimming: I find that these 'hair' sections look lovely when they are left shaggy and organic. But you can use a sharp pair of craft scissors to trim any uneven or stray lengths of yarn, if you would rather keep them looking neat and orderly.
Watch the tutorial below to learn the technique. In general, the technique below is easiest when stitching multiple strands of yarn.
You can also try this technique as well! This is often used for single strands of yarn, but you may enjoy stitching this way too. It's worth trying both methods and seeing which you prefer.

4. More Bobbles
You'll be filling in the final large section of your design using the same bobble technique and variegated green and solid green bobble yarn. The difference this time is that you'll be combining your bobble yarn colours to create a blended green design, rather than keeping them separate.
Prepare your bobble yarn as per the video in step 2, cutting the yarn so that each piece has 2x bobbles on them. Mix the cut pieces together and then attach them at random, ensuring the variegated and solid green yarn is blended as you go.
5. Weaving your Feather Yarn Grass
Now it's time to weave in the 'grass' on your mossy coaster.
Using your grass green and light green feather yarn, use the technique in the video below to cover the remaining spaces on your coaster. It's worth taking the extra time to weave under any bobble or latch-hooked yarn sections so that you can ensure the coaster is entirely covered.
Your grass green yarn will be stitched in the long shape towards the top of your design. Then the light green yarn will be stitched to cover the remaining space o your coaster.
Follow the below video tutorial to learn how to weave your grass section. Its a very simple technique, using your weaving needle you'll be stitching back and forth to cover the canvas section.
6. Pom Poms
Now that your coaster base is entirely covered, its time to add some fun, decorative details! You'll be creating 3x times of Pom Poms on this design, to create a super lush and textured feel - truly like an overgrown garden!
Watch the video below to learn to make pom poms and their variations. Then follow along with the yarn colour and sizing if you'd like your pom poms to look exactly like our finished coaster.
3x Yellow Small Pom Poms - These are classic mini pom poms using your light yellow milk yarn. Create these pom poms by placing your yarn length between your pointer and middle finger, then wrapping your yarn approximately 20x around your two fingers. When you've removed and tied your pom pom, trim the loops and use your plastic weaving needle to separate the strands of yarn to create a fluffy effect.
2x Orange Looped Small Pom Poms - These are even easier to create than your classic pom poms! Using your soft orange milk yarn, place the yarn length between your pointer and middle finger, then wrapping your yarn approximately 20x around your two fingers. Remove the pom pom and tie tightly, leaving it in its looped form to appear like a flower.
1x Mint Green Medium Pom Pom - You'll be making a single slightly larger pom pom in your mint green milk yarn. Begin by placing your yarn length between your pointer and middle finger, but this time you'll be wrapping your yarn around your first three fingers (not two!) approximately 25x to create a medium sized pom pom. Remove the pom pom and adjust your knot so that it is in the middle of your bundle before tying with a double knot. Use scissors to trim the loops, but this time leave the lengths as is to replicate the look of our coaster.
Placement on Coaster: Your finished pom poms can be placed anywhere on your coaster, but if you want to recreate our coaster exactly here are the notes for each section of pom poms. In the gap towards the top of your coaster, you'll place one yellow and one orange pom pom next to each other. You'll then place a single yellow pom pom nestled between the latch-hooked 'hair' moss and bobbles on the right side of your coaster. Finally the remaining three pom poms (yellow, orange and mint green) will be secured at the bottom left side of your coaster. Try to tie these on closely together so that they feel like they are 'growing' from the same patch in your garden.
TIP: You can really get creative with your pom poms! Feel free to mix up the colours of milk yarn and the pom pom techniques you use to make this coaster your own.

6. Pipe Cleaner Ladybugs
You've reached the final decorative step - its time to add the 'friends' into your Garden Friends Coaster! Our ladybug pipe cleaners are surprisingly simple to make and its so much fun to see them come to life. You'll be making 3x ladybugs for your coaster, but we've included extra pipe cleaners in case you need a practice run.
Pipe Cleaner Colours:
You will need the following colours to finish each ladybug.
1x red pipe cleaner
1x black pipe cleaner
2x black eyes
6-8x tiny off-cut pieces of black pipe cleaner
Easy as that! Watch the video below to learn how to create and attach your ladybugs.

Backing your Coaster
Congratulations on finishing the main part of your coaster! Now you're onto the home stretch, its time to work on the back of your coaster.
There are 2x steps to finishing your coaster, which we show in the below tutorial. First you'll need to roughly trim the canvas edging and sew it down to the back of your piece.
Then it's time to back your coaster with your felt either with glue or by sewing it. If you're using it as a decor piece or to hang on the wall, it may be better for you to leave it at it's current stage. It will be easier to hang on a wall hook if the back is free from felt.
Sewing your Backing
Our kit includes all of the supplies you need to sew the backing of your coaster.
To sew your fabric you'll want to trace the shape of your coaster so that you can cut out the felt fabric to match the shape. You can do this with a pencil or pen.
You will then need to pin your felt backing to your coaster so you can begin sewing the edges. You can do this by using sewing pins, bulldog clips or even tacking the back with a hot-glue gun. I find bulldog clips the easiest method of holding my coaster to the felt.
Using 3-strands of your cotton thread, begin stitching your canvas to your mossy coaster using a whip stitch. This just means that you will whip your thread around and around the edge of your coaster as you go around. Don't worry if your stitches don't look perfectly neat, they'll blend into the grass on your coaster and won't be visible when you're finished.
Gluing your Backing
If you have any fabric glue handy or a hot glue gun then you can also glue the backing of your coaster. We've included a glue stick for a standard craft hot glue gun, as well as a glue paddle if you have fabric glue.
To glue your fabric you'll simply place fabric glue across the middle of your felt square and place your coaster on top. Allow it to dry so that the coaster is secure - you may want to put a heavy book on top of your coaster to add pressure. Once it's dry you can take a sharp pair of scissors to cut around the coaster.
You can then top up the glue on the edges, if any sections are lifting up.
Join The Club!
Be the first to know about new products, special releases, and much more!
